Pages

Showing posts with label Sudan. Show all posts

Saturday, 2 October 2021

Desert Forces


... or pretty much, what I did during New Zealand's second COVID lockdown.

So the goal was to do something with the hordes of 20mm figures that had been replaced by newer sculpts and companies and recklessly stuffed in a box, and had come home from far to many Bring and Buys.

The second goal was to find a game and a way to teach my stepson about losing during a game, especially your 'favourite' figure of the day.

The result was a Black Powder supplement - greatly simplified with the addition of heroes, magic, monsters and machines, desert scenery and the desert forces themselves - which were meant to be reinforced by Redbox's Dark Alliance Mummies and Anubis army, which have as yet, failed to show up from muster - international shipping being what it is.

Excellent Adventures - Black Powder Supplement

I grabbed Hordes of the Things, Warmaster Revolution and Black Powder V2 and munged the first two into the third. What resulted was an exceptionally fun, and funny, not to be taken seriously supplement which worked really well - with very little rule changes for core BP rules.

We had hordes, steam tanks, Giger-moths, stoic British infantry, and crazy magicians firing off their fizzing silliness all over the place. Instead of trying to 'win' the object was to tell the 'story' and not mind which side you were on or who won - I guess teaching how to lose before teaching how to win - sounds counterintuitive I know, but I don't think we've laughed so much in ages.

Terrain

Building upon previous desert escapades, we updated the Temple of Seth with a couple of extensions.

Then, 'build a pyramid' he said, 'from the bricks we made from das' he said, 'it'll be fun'.
Ten hours later and we have a small pyramid, which I have to admit, set the scene nicely, even for the pyramids in northern Sudan (who knew they had them???)
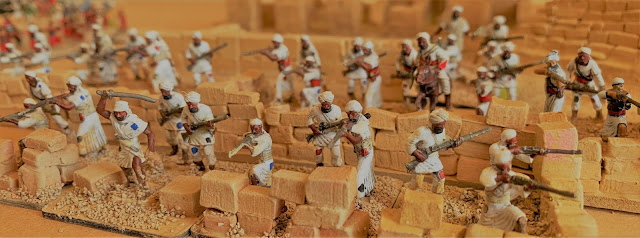
And of course you have to have an abandoned fort and a hastily erected stone defence robbed from said pyramid (see the 'good guy' photos for the stone defence).

The 'Bad Guys'

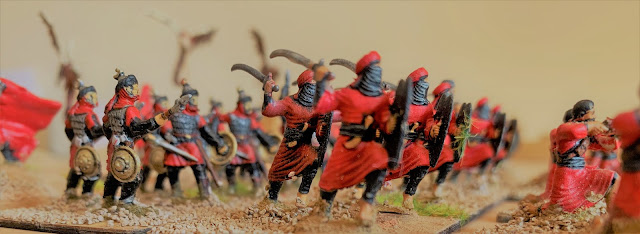
The bad guys, in a homage to Indiana Jones baddies, red and black theme and warriors from the Esci Set 238 Muslim Warriors and Italeri Set 6010 Saracen Warriors, flying horrors from Eagle Games Egyptian 'Age of Mythology' sprue, and a giant Djinn from the 25mm Ral Partha range.

Led by a great As-Sihr (magician) and hell bent on reaching the pyramid cemetery at Meroe to raise the dead and basically do 'bad things'.

Classic hordes of bad guys for your chosen heroes to fight, backed by a mighty Djinn hero.

The red and black certainly put colour on the board and the forces were finished off by further Eagle Games Egyptian sculpts of various monsters - used in a summoning/charm spell during the shooting round.

The 'Good Guys'

A lot of these were re-based from various HoTT forces and further photos can be found here.

Victoria's Forces

Stirling lads from various regiments stationed at Suakin, set out to chase and confront the As-Sihr forces. 

Mostly drawn from the old Esci Set 232Colonial India British Infantry and A Call To Arms Set 57 British Infantry Zulu War boxes of 1/72 awesomeness.

Including a regiment ordered to wear their red coats - one last time - to show the As-Sihr forces they were just as 'red' blooded as they were.

Inspired, many of the KRRC donned their old dark green for the coming battle.

The rest of the forces wore their new khaki smocks.

The special brigade (the only one with red epaulets) were led by their general.

Even a regimental chaplain volunteered to meet the As-Sihr and all their magical fizzing silliness, quoting "This maniacal fuddery-duddery just won't do!" - essentially a 'magician' that uses the Dwarven 'dispel magic' spell from Warmaster,
Envigoured by their comrades, the Camel Regiment joined in also, ditching their camels for local ponies - Italeri converted confederate cavalry.
Dismounted, the Camel Regiment loved to blow their own horn - Esci conversions.
Lost in the desert, a Major and his colleagues struggle on.

Some gas-powered Giger-moths for scouting and machine gun action.

A hero in a steam-driven armoured car joined the fray.

Along with a steam-driven tank (converted from Emhar, I think)

Sepoy Regiment

Worried by the rate at which the As-Sihr forces were drawing supporters from across the northern Sudan, the British dispatched reinforcements from India in the form of some Sepoys and cavalry. Drawn from the same Esci set above and Strelets Set 057 Bengal Lancers.

The general and some light foot troops.

A full regiment of Sepoys was a welcome sight given what faced the force at the Meroe pyramid cemetery.

As fierce as any British soldier.

Drawn from all over India.

The Indian 'lights' were a welcome addition for scouting and flank duties.

Those Caught In-between

The Mahdi's and Local Forces

Forces to make up the numbers on either side, depending on who they choose to support.

The addition of Red Sea pirates never hurt.

Madhist rifle-armed forces to make up more numbers.

A company of 'imports' from the Northern Frontier.

Most Excellent Adventures

So, having reused many very old bits and pieces, some most excellent adventures were had in the northern Sudanese desert. I might cobble together the additional rules for the future and wasn't really surprised that the magic from Warmaster fit right in to Black Powder given the lineage of these rulesets.

The heroes, machines and monsters required an adjustment of thinking for unit sizes (We only used Small and Tiny units for 'company-level' units), but all in all a completely unexpected success and now these figures can be used by a subsequent generation - as well as this one :)


Monday, 18 December 2017

Sudan: Scenario: Battle of Hashin


Thought I'd get this scenario up after posting the previous No Relief from the Midday Sun scenario.

This scenario has been played twice with close games standing at a one all victory for Brits and Ansar. Seems to be well balanced, with game one (battle report) and game two (battle report) both sea-sawing between victory for each side.

An A4 PDF of the scenario can be found here.

Hashin, Northern Sudan, March 1885
On the 21st March 1885, most elements of General Graham's Suakim brigade saw action at Hashin.

While the East Surrey Regiment and Royal Engineers set up communications and a fortified position a few miles to the east of Hashin, in the west, Ansar were sighted around a hill called the Dihilbat feature, and Graham sent his Indian Brigade, several regiments of foot, and elements of cavalry, forward to drive the Ansar from the feature - supported by the Guards Brigade.

Several smaller assaults and engagements followed but fearing envelopment by flanking Ansar from Tamai, and due to an over extension of division forces across several miles, before the Ansar made a more determined assault, the action resulted in Graham withdrawing his forces and subsequent battle at Tofrik the next day.

This scenario explores the 'what if' possibility that the Ansar mounted their attack at Hashin rather than Tofrek, before Graham had a chance to withdraw.

Area Around Hashin
The area around Hashin was open, yet covered with scrub and mimosa (6-8 feet high in some places).

The major features of the Hashin area were the Dihilbat spur or hill, and Beehive hill next to it, where Hashin was actually nestled - which can be represented by several small huts against the north-west of Beehive Hill.

Further to the north-west was another feature of broken ground called the Low spurs of the Waratab.

Tamai lay some miles to the south-west and was then a centre for Ansar troops.

There is an excellent map of this area on page 147 and description of the action in Lt. Col Snook's Go Strong into the Desert, published by Perry Miniatures.

Graham's division ended up spread over several miles, from Hashin and back east across open ground to the minor features where the Surreys and engineers were creating their redoubts.

Set Up
On the day, there were several sightings and interactions with the Ansar between 0940 and 1225, but no concerted major attack.

This scenario considers the situation where the Ansar, at some point between those times, made a coordinated and major assault of Graham's forward (western) elements, with original dispositions of those elements used as starting positions.

This makes the Dihilbat feature, Beehive Hill, and Low spurs of the Waratab the key features for the the scenario table.

So far we've used 280cm x 150cm and 300cm x 240cm tables to good effect for this scenario. I'm not sure what this is in Imperial measure, probably a few cubits and Google can do the conversions for you... or alternatively it may be easier to move to a country that employs modern measurements... :)

As we know the lay of the land, on the British side of the table, set up should include Beehive Hill (hill feature) and Dihilbat Hill (large hill feature). These should be set up on the table edge in the centre, with just enough room between the features to house a British square.

If you are fortunate to have enough terrain, the Dihilbat feature should stretch almost across the board and be set up on the British player's left.


The Low spurs of the Waratab should cover a good portion of the Ansar player's left quarter and represent uneven, undulating even, semi-broken ground, and stretch up to the centre of the table.

The rest of the ground was fairly open but much of it covered in scrub and Mimosa, so if you have these terrain pieces, a good portion of the open ground can be covered in scrub - providing further cover for the Ansar.

Also we employ a house rule called Sudanese Rough Ground.

Most features are rocky or covered in scrub. Given the superb tactical use by the Ansar and effect on British cavalry (they get mauled when fighting in it), Sudanese Rough Ground is as follows: as per Rough Ground, plus Unclear targets, Ansar infantry get Cover, -2 morale saves to cavalry fighting H2H in it.

So there should be a good mix of Rough Ground and Sudanese Rough Ground on the table.

Measurements are for 20-28mm standard basing and Brigade Square rules are used, with even partial brigade squares claiming supports from other units in the square. All Cav units are Marauders.

Unless otherwise specified, units are assumed as listed in Blood on the Nile supplement.

Forces
Commanders
Each side gets two commanders, including the army general.

British Forces
Indian Brigade: The 5th Ludhiana Sikhs, 17th Bengal Native Infantry, and 28th Bombay Native Infantry (3x Standard BP formations),  9th Bengal Lancers (Standard BP formation), a Naval Brigade Gardner and Tiny support formation, and 2 screw guns (or one medium artillery piece).

2nd Brigade: The Berkshire Regiment and Royal Marine Light Infantry (2x Standard BP formations), squadron of 9th Bengal lancers (Small BP formation).

Reinforcements: 1st Battalion Coldstream Guards, 3rd Battalion Scots Guards (2x Standard 'guards' BP formation, starting off table, available from turn three onward, and assigned to a brigade as the general sees fit).

Ansar Forces
Green Flag Rub: 6 x Hadendowa (Standard BP spear/sword formations)
Black Flag Rub: 3 x spearmen/swordsmen (Standard BP formations), 2 x African Riflemen (Standard BP formations), 3 x Small rifle-armed skirmishers.

For some reason this scenario suits a ratio close to 1:1 British:Ansar rather than 1:1.5. I think this is because the terrain favours the Ansar and the African (slave) Riflemen are given a shooting quality of 3 (as per the indications of their projected firepower in Michael Asher's history of the Sudan conflict called 'Khartoum').

Its worked twice so far, but if it seems weighted in the Brits favour, chuck a couple more spearmen units into the mix for good measure, and stir thoroughly. Or vice versa.

Force Notes
  • Ansar Spearmen and Riflemen are Warband, Spearmen are fanatics.
  • Ansar Riflemen have a shooting quality of 3 and H2H of 4.
  • Ansar Riflemen and Skirmishers are armed with Breech-loading Rifles.
  • All British forces are Steady.
  • Guards are Elite 4+.
  • Bengal lancers are Marauders but do not count Lance. They were only given lances two weeks before this action so are treated as 'lance-armed' Medium Cavalry.
  • The Naval Gardener gun is considered Accompanied, in that the Tiny Naval Brigade unit is 'attached' to the gun. So if at least two of the Naval Brigade figures are touching the gun, it can move as Infantry.

Dispositions
Along with the lay of the land, we are fairly certain of the dispositions of the British on the day. As such, at the start of the game:
  • the two screw guns are placed on Beehive Hill
  • the 5th, 17th, 28th, along with the Gardener are placed in a partial brigade square in between Beehive Hill and the Dihilbat feature
  • the Berkshire Regiment and Royal Marine Light Infantry are placed on the Dihilbat feature near the table edge
  • the Bengal lancer units are placed anywhere within 30cms (12 inches) of the British player's table edge.
  • reinforcements arrive at the beginning of the British player's turn three and units can be assigned to either or both brigades as the player sees fit, placed on the table edge nearest the brigade the unit will join.
See photo map above for indications of British dispositions at the beginning of the game.

For the Ansar, we know where they were around 0940, massing around the Low spurs of the Waratab and several masses of Ansar were south of the Dihilbat feature and on the feature itself. We also know that Tamai was not that far away to the South-west. As such:
  • Ansar enter the game in the first round, from either corner of the Ansar player's table edge and
  • One Riflemen unit and Skirmish unit is placed on or to the left and touching the Dihilbat feature, at the centre of the board.
Victory
Gentlemen and woman will either concede or not force their opponents to continue, perhaps before one brigade is entirely broken and the other is mostly shattered.

I hope you enjoy the scenario as much as we have.

Saturday, 16 December 2017

Sudan: Scenario: No Relief from the Midday Sun


Having finished a bit early for the year and having received my "Xmas Present" to myself in the post from Newline Designs (20mm Hadendowa, Yorks and Lancs, and some dismounted camel corp to provide dismounted cavalry options), I thought I'd write up a scenario for when they are all painted... hopefully sometime in January... hahahahaha...

... well given all existing Hadendowa will be re-based and touched up... it might take a bit longer...

Anyhow, given the success of the Battle of Hashin scenario, fought twice now, here's one which uses the Brigade Square rules.

Note all measurements are made in metric... because its the 21st Century and base 10 is king - who the hell uses fractions any more... but its easy to remember that 12 inches = ~30cms.

An A4 PDF of the scenario can be found here.

No Relief from the Midday Sun

In the north of Sudan, a brigade has been caught out in the open, on its way to relieve Gordon at Khartoum.

For two days at least, dust on the horizon, coupled with glimpses of Ansar in the distance, has convinced the brigade commander that an attack is likely.

Fearing the worse, they have formed their brigade into a square and set the cavalry off to reconnoiter.

Table

As it might be a bit of a stretch for some to build a table of this size (232cms x 232cms), just note that the scenario is set for the Ansar to be just in range of Breech-Loading Rifles when they come on the table - hence the terrain -  and for them to have to make at least two full moves to get into contact.

If you're stretched for space just imagine the distance from an edge of the table to the face of a British square unit is 1 meter away (~39 inches), and make the Ansar have to move accordingly.

Set Up

  • Measurements are for 20-28mm standard basing
  • Brigade Square rules
  • British square must be set up in the centre of the board with each battlion face at least 1 meter away from the edge of the board and it cannot move (it will not risk the chance of gaps opening up in the brigade square)
  • Ansar place Terrain
  • 4 Manditory terrian pieces min 30cms in length, 4 optional terrain pieces of any size, Roll 1d6, placed on 4-6
  • At least one part of a terrain piece must touch the Ansar deployment zone and be no closer than 60cms to the British square
  • British calavry units may be placed anywhere on the table, outside of the Ansar deployment zone
  • Ansar attacking a side of a square may attack only the facing British unit or the facing unit and one adjacent artillery piece
  • Only Sml Ansar Skirmish units may indivdually attack  a square artillery piece in hand to hand
  • British facing units not in combat themselves and who are adjacent to an artillery piece attacked by Ansar Skirmish units may add 1 hand to hand attack to the combat
  • Sml British Skirmish Inf units may move through the square's facing units and artillery at will

Forces
British: 5x Std Inf, 1 x Sml Inf, 1x Std Cav, 1x Sml Cav, 1x 9 Pdr, 2x Gattling, 1x Gardner
Ansar: 9x Std Inf, 4x Sml Inf, 3x Std Camel, 2x Sml Camel
Ratio approx. 1:1.5, British:Ansar

Force Notes
  • Ansar Std Inf are Fanatic Warband
  • British Std Inf are Steady
  • Ansar Skirmish Inf carry breech-loading rifles, all else carry spears
  • Camels and all Sml Inf units are Skirmishers
  • Sml British Cav unit may dismount, becoming a Sml Skirmish Inf unit
  • All Cav units are Marauders
  • Ansar max four commands per side, including Army Commander
  • British max three commands per side, including Army Commander
  • Add other special rules as desired but balanced between forces
Unless otherwise specified, units are assumed as listed in Blood on the Nile supplement.

Victory
First side to loose 5 units, Shaken or outright - small units and artillery count as half a unit.

Tuesday, 17 October 2017

Sudan: Royal Artillery (Limbered)


The Clear the Desk painting challenge continues, with first units for an intended Camel Corps Brigade, completed for Black Powder: Blood on the Nile.

These guys sat requiring construction, next to the undercoated Ja'liyin from the previous post for ages. The limber, crew, and horses are ZW54 and ZW55 from Newline's Zulu range, and the 9pdr guns and crew are from HaT's 8210 British Colonial Artillery.


Yes, I know the horse team is meant to be made up of six horses, which would look good, but doesn't scale well in BP, so there's two per team for this army.
As both sets were produced for the Zulu war, all the crew have had puggaree conversions, which is only just and proper, and why I think I procrastinated so long before completing them, but in the end the conversions only took about half an hour to do all twelve.


The limber came together with no hassles, with only some fiddlyness when mounting everything together, at once, with white glue and super glue, coz I'm impatient :). As ever the Newline metals prepped in about ten minutes. A commission painter prepped the guns so can't comment on them but from the box art diagram, them look fairly simple (3 pces: wheels, carriage, and barrel).


Its good to get a couple of core units for a brigade out the way (they can be used for any British brigade) and its on to the next thing I found, wrapped up in tissue paper, smushed up in a plastic bag, right at the back of the desk - a group of Sci Fi figures to finish a unit I started in 1995!

Saturday, 14 October 2017

Sudan: Ja'liyin Tribesmen


Halfway through the Clear the Desk painting challenge, for your viewing pleasure (not really eye candy, more eye broccoli), some Ja'liyin tribesmen for the Black Powder, Blood on the Nile supplement. These have been made up from multiple 20mm plastic sets as there aren't any of these tribesmen on the market - and have been undercoated and getting caught up in the curtains behind the desk occasionally, for well over a year.


The rank and file are the peltasts/light troops from HaT's 8044 Alexander's Light Infantry (in a previous life, they were actually peltasts painted by Chasseur) and the Numidians from HaT's 8020 Hannibal's Carthaginians - African Infantry set, with the shields shaved off.

The Emir on horseback and the standard bearer are also from HaT, 8249 El Cid Moorish Command, and one Emir on a donkey from Waterloo 1815's 011 Dervish Infantry.


The reference is from Col. Snooks' Go Strong in the Desert, Plate 23 on page 98 and contemporary coloured sketch on page 101. With many more plates from Michael Perry in the book, this is a must have reference for this period and I reckoned seeing how they made the effort to research the tribe, I'd make the effort to individually paint the 24 diamond patches and coloured bands onto the jibhas of these 20mm figures :)

Still, I reckon I know one sure fire thing to remedy the pressing hordes of Ansar, next to which these guys will take their place: some Limbered Royal Artillery from the same period.


Monday, 24 April 2017

Sudan: Updated Posts


So for some reason the photos from posts carried over from the old blog must have been removed and been only linked by this blog. Have updated each of the effected Sudan posts with correct photos.

Sudan: Cameron Highlanders
Sudan: New South Wales Regiment
Sudan: KRRC & Royal Marines
Sudan: Indian Brigade
Sudan: Hadendowa
Sudan: Ansar
Sudan: Old Ansar Units and the Joker
Sudan 1000: The Count So Far... Have shot past this count in the past year and now heading to Sudan 1500... for 1500 figures on a table at once...


Monday, 6 February 2017

Sudan: 2nd Action at Hashin - Black Powder Battle Report


Forces of the Black Flag make their way towards the Dihilbat Feature from the direction of Tamai.

It was a particularly blistering hot day near Hashin as the Indian brigade and elements from General Graham's second brigade made their way through the valley between Beehive Hill and the southern end of the Dihilbat Feature. As two huge palls of dust rose in the north, east and west of his position, he did not need the confirmation from the recently returned scouts to realise there were two large Ansar forces heading his way. It was time to deploy...

What follows was an excellent game with three good fellows from the Grumpy (old man) Shed Group who acquiesced to fight the Hashin 'what if' scenario previously reported.

Set up almost exactly matched the first battle only on a slightly larger game area, so see the previous post for maps. Also a couple of units were added to both sides.

Anglo-Egyptian Forces (Tim)
Indian Brigade: The 5th Ludhiana Sikhs, 17th Bengal Native Infantry, and 28th Bombay Native Infantry (3x Standard BP formations),  9th Bengal Lancers (Standard BP formation), a Naval Brigade Gardner and Tiny support formation, and 2 screw guns.

2nd Brigade: The Berkshire Regiment and Royal Marine Light Infantry (2x Standard BP formations), squadron of 9th Bengal lancers (Small BP formation).

Reinforcements: 1st Battalion Coldstream Guards, 3rd Battalion Scots Guards (2x Standard 'guards' BP formation, starting off table, available from turn three onward, and assigned to a brigade as the general sees fit).

Ansar Forces
Green Flag Rub (Mike): 6 x Hadendowa (Standard BP spear/sword formations)
Black Flag Rub (Stephen): 3 x spearmen/swordsmen (Standard BP formations), 2 x African Riflemen (Standard BP formations), 3 x Small rifle-armed skirmishers.


Green flag begins their advance through the low spurs of the Waratab.

Unlike last time, the Ansar came in from both the direction of Tamai (top photo) and the Low Spurs of the Waratab (photo above), from both corners of the board.


Indian Brigade deploys in the depression between Beehive Hill and the Dihilbat Feature, with elements of 2nd Brigade on the southern spur of Dihilbat.

Turn One
The Anglo-Egyptians held firm in their starting positions as the Ansar advance began, although the main body of the Black Flag rub failed to activate.

Squadron of 9th Bengals face the the advancing Black Flag skirmishers on right flank and take fire.


Green Flag after turn one, moving through the spurs and pausing at the edge.

Tim moved the Indian Brigade over to the left to make room for the 2nd Brigade, who came off the Dihilbat spur, causing dispositions to almost exactly match those of the actual battle, and sent the 9th Bengal Lancers forward into the desert.


Turn Two
One good command roll later and it was all on. The Green flag rolled well enough to rush across the board from the right flank, through the low spurs and into the Indian brigade.


After closing fire, the square held firm and the fighting continued into the next round.

On the left flank, again the Riflemen of the Black Flag forces failed to activate and were left at the northern end of the Dihilbat spurs, as the 9th Bengals raced across the board to get behind them.


Turn Three
British reinforcements arrive.

The Coldstreams took to the left flank Dihilbat spur and fired.


Causing the lead element of the Black Flag spearmen - who had shot forwards behind the left side of the Dihilbat Feature - to become disordered.


In the center the Scots Guards had joined the Indian Brigade and immediately closed the brigade square as the fighting continued.


Which was fortunate as even though the right-most Sepoy repulsed the first wave, the battalion succumbed to the continued onslaught and was destroyed.

Turn Four
The Ansar rushed into the gap, smashing into the Scots Guard in their flank...

... but were caught by traversing fire from the Screw Guns on the hill and retired from the battle.


Still the square held firm even though the Gardner had become Disordered...


... and was reformed into a 'harbour'/triangle/squarish thingy (the maths was too hard ((3x6)+1)/4=... triangle!) as fierce firing and fighting caused disorder amongst the Hadendowa and the 5th Sikhs to become shaken.


Meanwhile the Blag Flag spearmen raced up the left face of the Dihilbat, smashing into the Coldstreams, who held firm but were Shaken for their efforts.


The 9th Bengal Lancers, who had previously rushed completely across the board to try and flank the Black Flag, were finally reined in and turned around to hit the trailing Green Flag spearmen in the rear...

Causing a surprise outcome for both sides.

Where'd everything go - total destruction in the center of the board.

Turn Five
The center held firm for the Anglo-Egyptians with the Sikhs repulsing the wave of Hadendowa, making serious inroads towards breaking the Green Flag rub.


But on the left flank the Black Flag began its attack in earnest as the 2nd Brigade moved up in support positions.

African Riflemen begin pelting the Berkshires, who in turn returned fire, disordering the riflemen.


The Coldsreams took the brunt of the continued assault, supported by the Royal Marine Light Infantry (RMLI) and Berkshires below.


They succumbed to the prolonged fight but pushed back the attacking Ansar horde before they too fell back.


Turn Six
The Black Flag assault continued with a fresh wave of Beja spearmen rushing headlong into the RMLI.


Who immediately crumbled under the assault after the Beja re-rolled missed H-2-H for six hits.


The Blag Flag skirmishers took up positions on the Dihilbat to continue to rain fire down on the Berkshires.


Meanwhile back in the center a wave of Hadendowa raced up Beehive Hill to assault the artillery position...

...and ended up completely annihilating it.

Turn Seven, Eight, & Possibly Even Nine(?)
Not sure what happened, it was the heat of the battle and seem to have missed a few photos. Suffice to say that the Green Flag Rub - almost broken - ended up entirely pressurizing the Indian Brigade.


The Black Flag skirmishers and Riflemen continued to harry the Berkshires from the peak of the Dihilbat Feature...

... until they too succumbed.


While streaming over the Dihilbat, this was one of the last things the Coldstreams saw...


This final Black Flag assault entirely decimated the 2nd Brigade, leaving the Indian Brigade battling on in the center, but now completely enveloped.


And in the last round of combat, the 5th Ludhiana Sikhs fell, taking a body of Hadendowa with them, and the game was called.


This was another well fought and close game, 2-1 to the Ansar.

Mike and Stephen ended up enacting classic Ansar skirmish and envelopment tactics, much to the glee of this SOG.

The battle provided a good demonstration of why General Graham, forces over-extended and without the close and mutual support of full brigade squares, chose to fall back on the 21st March 1885.

So hats off to Tim who endured especially well given he had no choice but to fight, faced two opponents, overwhelming numbers, and alls I did was hang about making umpirish noises and cracking jokes 👍

Once again Black Powder more than delivers to period expectations, a totally excellent ruleset!