Pages

Saturday, 24 December 2016

AWI: ABC Introduction to Uniforms and Sources


If I wanted for anything when I started gaming this period, it was a general introduction to uniforms and pointers to good guides on the uniforms themselves. There were so many different units, uniforms, nationalities, exceptions and terms.

Trouble is, this was the reason there were no general guides in the first place, because of the differences. But having been reading about this period for over ten years now (OMG time flies!) and having covered most of the contemporary sources, I thought I'd give writing an introduction to the uniforms a crack.


So there is only really one rule of thumb when considering uniforms for this period 'check the sources for confirmation'. That's it. There's bound to be exceptions and differences for even the same regiment over time, because of campaign standards, uniform availability, and the like.

Single AWI Rule of Thumb: check the sources for confirmation.

But having established that rule of thumb it is possible to provide a light general introduction to the uniforms of the period, focusing mostly on uniform terms and infantry - using the British uniform as a benchmark/standard and acknowledging that:
- the militias of the period didn't wear uniforms
- for every statement I make here, there will be exceptions; hence the rule of thumb above.

ABC: Coats, Facings, Cuffs, and Turnbacks (Linings)
Most uniforms included a medium length coat of a certain colour. The coat colours were red for the British, commonly blue or brown for the American Continentals, white for the French, light blue for French Colony regiments, and blue or green for the Germans. Loyalists were given green cloth early on in the war for their coats and red cloth later, as per their British counterparts.

Most regiments had their own official 'colour'. The colours included red, green, yellow, blues, pinks, black, burgundy, white, to name a few common ones. This is best thought of and often referred to as the regimental colour. Not to be confused with - but which are related to - the regimental colours, which refer to the flags and standards many regiments carried.

The coats had tails and were lined with a fabric of a different colour to the coat. The tails were able to be buttoned back and the resulting buttoned tails are referred to as turnbacks. In many cases the lining and hence turnbacks were white, other times the regimental colour.

Turnback examples circled in yellow, 'Hessians' with red turnbacks, British with white.

Coats were faced with strips of fabric which ran down the front of the coat where the buttons and buttonholes were situated and would be of the regimental colour; as would be the collars and lapels. These are all referred to as facings.

Finally the cuffs of the coats were also picked out in the regimental colour - also commonly included in the term facings.

Facings and cuffs: British Colonel and his troops display their blue regimental colour on the common areas of their standard red coat.

Underneath the coat a wastecoat would also be worn, with the majority of regiments having a standard colour for their wastecoats.

To tie it all together, the regimental colour was used as the colour for the facings and cuffs of a regiment's coats, and in some cases the turnbacks.

Facings and cuffs: British regimental colour examples, L to R: white, yellow, blue, and green.

But when some hoary old wargame nut is waxing lyrical about facings and turnbacks, you can relax and follow their rants knowing that in summary: each regiment had its own colour and that the cuffs and facings of their coats would generally be of that colour.

ABC: Exceptions
American Continentals: became more uniformly dressed as the war progressed and they followed the same standard with their coats as described above, although possibly with a little more relaxed approach to following strict regimental standards and adopting a regimental colour.

Its possibly more accurate to describe them as following the general style of dress for the period, as their uniform lotteries allowed and the availability of uniforms increased - with some American regiments even receiving batches of coats with different facing/cuff/turnback arrangements.

Musicians: I covered these in an earlier post on painting but will post here again for completeness.

Reversed Coats: British drummers (musicians) regimental colour for the coat with facings and cuffs of red (blue drummer is incorrect and should be red faced blue).

Musicians were often dressed differently to their units, for easy identification in the field. Many of the musicians of the period had 'reversed coats', with the facings/cuffs and coat colour of their regiment reversed.

Reversed Coats: American Continental drummer and fifer (musicians), regimental colour for coat with facings and cuffs the colour of the regiment's coat.

I was going to write that reversed coats for musicians was a general rule of thumb but came up with more exceptions to the rule. So to the best of my knowledge:
- British Line Musicians: reversed coats
- British Guard Musicians and units with blue as regimental colour: same as regiment
- French Musicians: royal blue coats and facings/cuffs the same as their regiment
- German ('Hessian') Musicians: same as their regiment
- Loyalist Musicians: (if uniformed) some reversed others the same as regiment**
- American Continental Musicians*: reversed coats unless they don't**
- American Militia*: um... lucky to have uniforms, wing it or research

* early on British uniforms were used, especially for officers and musicians, so would be red with whatever facing/cuff colour they could nick, er borrow, er commandeer, or reversed coats for the musicians if they could get them.
** more likely to be uniformly dressed and better uniformed to the standard of the day (reversed coats) in the later part of the war

Hessian Musicians: drummer's coat the same as the rest of the regiment - not reversed.

Although sometimes the musicians of American units were dressed in a unique way specific to the regiment - which only research will confirm.

Hessian Musicians: Jager drummer's coat the same as the rest of the regiment - not reversed.

French: In 1779 the French adopted a new uniform standard and stopped facing their coats as above and instead edged the 'facing' areas, referred to as edging/piping or as facings edged with or piped with, to produce facings of the same colour as the coat but with piping of the regimental colour, just to confuse things further. Good luck picking the piping out on 15mm or 20mm figuures!

Militia: didn't have uniforms and wore frilly pink tutus into battle... no, not really, they wore their normal clothes, although their officers and musicians often wore a uniform of some description, and its not unfeasible that some, most, or a few of a militia's soldiers had uniforms of some description.

Campaign dress: individual regiments may adopt different dress on a given day/campaign which could include cut down coats as with the British light infantry, or hunting shirts as with many American regiments.

Cavalry: individual regiments and squadrons could be dressed differently, some to no particular standard, others to strict regimental standards like the British Light Dragoons and Lauzun's Legion Hussars; or to a standard somewhere in between.
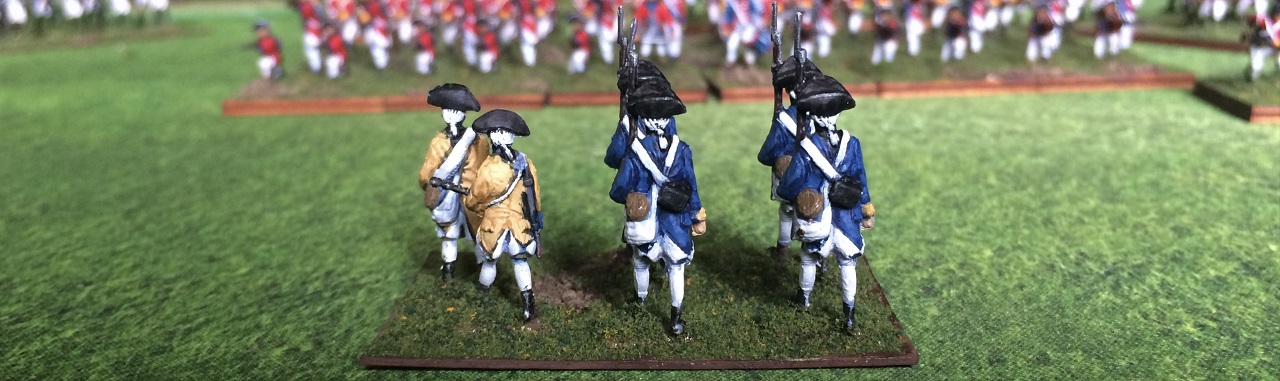

Reversed Coats: a shot from behind of American Continentals and musicians with reversed coats, note the white turnbacks for soldiers and musicians.

ABC: Gaters, Stockings, and 3/4 Length Trousers
The common trouser of the day was a 3/4 length trou that ended just past the knee (red circle below). To cover the lower leg, below where the trou ended, gaiters were worn to prevent a soldier's stockings (yes stockings) from becoming splattered with mud.


There were two common types of gaiters which we shall call long and short. The short gaiter (yellow circle above) ended just above the ankle and the long gaiter ended just above the knee. Gaiters could be either white (blue circle below), black (white circle below), or leather coloured. Gaiters were made from leather or cloth. There were also medium length gaiters that ended just above the calf.


Out of interest the gaiter was also called a splatterdash - as in 'damn your splatterdashes man, get your regiment up that hill!'

Just to provide more confusion for this area, long trousers and overalls were worn and also became common as the period progressed.

ABC: Hats, Caps, Helmets, and Powdered Wigs
In brief - as this is one area where only research will confirm what regiment wore a certain type of headgear - the most common headgear for the period was a broad-brimmed hat with the brim angled up three times and often laced with white, gold or black lace, also called a Tricorn. Another common derivation of this hat was a broad-brimmed hat with only one side cocked up and often festooned with bearskin or feathers.

Cocked hats or Tricorns.

Other common headgear of the period included leather caps of varying description and fashion, some with plumes and in some cases adorned with a metal frontplate.

Hessian grenadiers wearing caps with a high faced metal frontplate.

Caps were favoured by grenadiers, light infantry and cavalry, with some grenadiers also sporting a bearskin cover - see pictures of British drummers above for an example of this, although later in the period, as their uniform became more regular, some American Continental regiments were also issued caps of varying description.

Caps were worn by many light infantry units and could be adorned with plumes of varying description.

For completeness, Lauzun's Legion Hussars wore the very discreet Mirliton hat - which towered several meters into the air and was made of cheese.. no, not really, but it did stand over a foot tall. Some light cavalry even wore helmets fashioned on the Roman/Greek style but mostly made of leather.

It seems that everyone wore a wig as well - must have taken them ages to get ready in the morning - fashioned from human and horse hair, tied back in a ponytail.

Wigs, I paint all of mine white, although this is not seemingly the case for all wigs - I am basically a lazy person.

As every figure of the period seems to be modelled with a wig and it was the standard of fashion of the day, required in standing orders, its fair to consider it a mandatory part of the uniform - especially as I have read that soldiers could be flogged for showing up to muster without one (ref: Redcoats by Richard Holmes).

Artillery
The international uniform standard for artillery of the period was blue coats with red facings and cuffs as described above; with wastecoats and trousers of varying colours - mostly blue or white.

No, I don't know why this standard was adopted by all nations, but this was the norm for all nations with the occasional exception by the Americans - which only research will confirm.

Varying headgear was worn including tricorns, caps, and the pokalem - which is not a fast formal dance but a type of forage cap worn by the French.

And for clarity, even the British adopted this standard so their artillerymen did not wear red coats.

In Summary

That's a fairly basic but comprehensive introduction to the uniforms of the day. As you can see though, every area of the uniform has exceptions and no hard and fast rule of thumb, and because there are so many exceptions to the uniforms of the period, you can't do without good sources for this period.

Uniform Sources

These are the sources I use to get the uniforms 'rightish' or 'not completely wrong'.

Black Powder: Rebellion! AWI Supplement

Left: My well thumbed copy of the AWI supplement for the Black Powder war game.

Even if you don't play Warlord Games' Black Powder, this is the most comprehensive uniform guide I have come across in terms of information that is in one place. There are over 40 pages concisely dedicated to the forces and their uniforms, presented as text, tables, and excellent 28mm eye candy of Perry Miniatures figures. For each nationality the table information is one of the most valuable contemporary sources around today, listing the regiments and their: uniforms, coat types, facing, cuffs, and turnback colours, for pretty much every unit that fought in the war.

For those that don't play black powder this supplement is still a good investment as apart from the comprehensive uniform guide it also has: an overview of the entire period, weapons and tactics, and commanders, and 19 scenarios based on historic actions from the period that could be modified for any rule set.

This is my most highly recommended uniform source for the AWI period.

Osprey Books
My collection of campaign references from Osprey Publishing.

Obviously the content of these books provides excellent information on the major campaigns but they also provide the legendary colour plates of the forces that fought in the conflict, providing an accurate visual reference.

Uniforms of The American Revolution: a great and free internet source with a fairly comprehensive collection of contemporary artwork regarding the uniforms of the period.

Baccus 6mm Figures: uniform pages for the AWI come up when doing the Goolge searches below, although I can't navigate to the actual pages using their site, so use the Google 'Visit page' link in an image search to actually get to the pages. Just click on the thumbs and choose 'Visit Page'.


Baccus thumbs look like the above on Google searches.

Google Images and PinInterest: seriously, just type in 'AWI' 'insertnationalityhere' and 'uniform' and - guided by other sources -  get inspired by the visual results.


Awwwwwwww! Puss came to play while I was snapping the uniform shots.

In summary there weren't many rules of thumb for the uniforms of this period without equally as many exceptions. This is both the hardest thing about this period if you're worried about accuracy and also one of its strong points because it results in a wargames table full of colour and different units.

But don't let it put you off, even just browsing the internet would give you the information you need to start an army. There are even some shortcuts for painting figures to a reasonable standard.

Tuesday, 20 December 2016

AWI: The ABC, Paint By Numbers, Lazy Way to Paint 1/72 Scale AWI


I am perhaps too impatient for this hobby, which lets face it, is several hobbies combined into one. There's: collecting, modelling, painting, military history, and gaming.

When my grandiose and narcissistic internal workings alight upon a new period or set of figures, or even a new rule set, I don't think "yea, just a couple of units, made up of a few figures will do', oh no... I see a giant table covered in many, many units from both sides and detailed terrain, with at least four players a side playing, and I want all of it right then and there - because I don't get out much.

When it comes to painting, I try to do as much as I can, with as little effort and in as short as time as possible - including commissions when I have the cash spare.

So here's my quick and easy way for painting those AWI nobs in their white tights and powdered wigs, for a decent 'arms-length and a little closer' kind of finish - I like to think of it as an 'optimised' approach.

Prep Work
Make sure you take the time to flash the figures (removing mould lines) and to mount them for painting.

I use strips of cardboard or ice-lolly sticks, and white glue to mount the figures for painting: 4 - 6 figures per stick. Do not underestimate the amount of time this type of mounting will save during painting, by drastically reducing the amount of handling (picking up, putting down, changing hold positions).

Unless painting a whole heap of different figure poses, try and mount the figures of the same poses together on the sticks.

Step One: White Undercoat

Spray the little suckers white - don't paint the undercoat on. For me sprayed undercoat provides a nice even base for subsequent layers and although I do use a brush sometimes, painting the undercoat on never works so well with 1/72 plastic figures (even after washing), so requires several goes at it and it just drives me crazy.

But as most of the strapping and uniform is actually white and the facings are mostly bright or pale colours, don't set yourself up for hours of painting coat upon coat to cover a dark undercoat. The next step will produce any overall shading you require.

Step Two: Washing or Paint By Numbers
These are some of the most complex uniforms to paint so make it easy on yourself. Over the white undercoat do a thin (really thin) wash of deep blue-grey, I use Citidel's 'The Fang'.


This sets me up in two ways:
- it provides a decent shading for white areas and equipment.
- it clearly picks out all the detail in little blocks like a 'paint-by-numbers' puzzle.


This will increase painting efficiency as you can plan how to paint the figure as you go and get guided lines to help steady your strokes.

I also apply a thin black wash over the musket/weapons, hands, face, and helmet/hat to provide a deeper shading in these areas.


Step Three: Block the Suckers Out
Now just block paint the coat, wastecoat, and trousers/tights, facings and cuffs the appropriate colours. For the coat, for medium to dark tones, I almost wash it with a fairly thick wash, letting the white undercoat come through. With the white I leave the blue-grey in the deep crevices of the molded details, to immediately cause shading.


For each block colour I use a two step process. First I identify larger areas of block work and use a medium sized brush, then I identify the small areas of blockwork and use a detailing brush.

To be fair, apart from mistakes, errant splotches, and anally retentive finishing, the white parts of the uniform are finished at this point.

I apply a wash over the coat area using a Citadel shade slightly darker than the original block colour. This provides shading for non-white areas and ties in the block work. I also highlight darker shaded coats.


Step Four: Pick Out The Highlights
Probably the most time intensive step but the steps up to this point have paved the way to do each highlight area/item quickly using a detailing brush.


For detailing I usually follow this general sequence: webbing/straps, equipment, hat/helmet, musket, facings, wigs.


The last lot of detailing I do is the flesh, to which I also apply a dark red wash over the face.


The absolutely last things I do are the command and musicians, they need a bit more focus than most troops.


Many of the musicians of the period have 'reversed coats', with the facings/cuffs and coat colour of their regiment reversed - this was to make them stand out to the enemy nice and obvious like...

I was going to write that reversed coats for musicians was a general rule of thumb but came up with more exceptions to the rule. So to the best of my knowledge:
- British Line Musicians: reversed coats
- French Musicians: royal blue coats and facings/cuffs the same as their regiment
- German Musicians: same as their regiment
- British Guard Musicians: same as regiment or reversed, check as per actual regiment
- Loyalist Musicians: (if uniformed) some reversed others the same as regiment**
- American Continental Musicians*: reversed coats unless they don't**
- American Militia*: um... lucky to have uniforms, wing it or research

* early on British uniforms were used, especially for officers and musicians, so would be red with whatever facing/cuff colour they could nick, er borrow, er commandeer.
** more likely to be uniformly dressed and better uniformed to the standard of the day (reversed coats) in the later part of the war

Step Five: Clean Up, Base, and Varnish
Fix up any errant brush strokes made during any of the steps above and call it quits. Then its off the mounting sticks, onto the bases and off for a matt varnish; my basing method is just as driven by impatience BTW.

I tend to play with the figures on the base without any glue to start with, as a dry run until I like how they look; then use white glue to fix them to the base(s).


Once the glue for the figures is dry use white glue and fine miniature pebbles stuff to create random splotches of roughness.


Paint the base and rough areas with a watered down dark brown; as long as the rough areas have a good coverage, the rest only needs a wash - note the water dilution helps get into the rough areas.


Flock using white glue and a pretty grass mix of flock - don't flock or glue the rough areas.


Gently drybrush the rough areas with tan, buff or similar, and mount the standard if there is one. Note some of the pebbles will come off, just patch it up with a splotch of paint.


Then spray with a matt varnish - I use the Army Painter Anti-Shine. For 1/72 figures with particularly bendy plastic, before varnishing I paint a layer of white glue on weapons and other pointy, bendy, bits. This will help prevent paint from cracking and coming off when areas bend during games, storage, and transport.

All in all I think I can churn out a 20mm (1/72) AWI Black Powder battalion in about 3 - 6 hours using this method (that's not elapsed time - so not counting drying time and prep, watching TV, eating, riding, sleeping, or browsing porn), including basing and depending on the colours of the uniform, which isn't too bad at all.

But having reviewed all the steps, it doesn't seem that quick now!

How To Paint Properly
Also for a really good and professional finish and to check out how to actually paint properly, then check Le Chasseur's excellent 28mm Napoleonics and painting guides. Otherwise pass me the next box of figures, I've got another twenty units to do. :)

PS: sometimes this method does not immediately give rise to great looking figures and it really is about building up shading and highlights - like proper methods - no matter what the primary colour is. The picture below demonstrates both these points - snapped after the blocking and shading work was completed for a bright red New Jersey unit with a dark blue coat.

Note: it was over 25 degrees Celsius when I did the first blue-grey and black washes and they didn't dry well at all, literally producing the reverse finish than I'd intended - darkening high points.

Friday, 16 December 2016

AWI: British Guards


Another unit for the Brits, a standard BP guards battalion - blue facings.


These are again from the Accurate/IMEX Set 512 British Redcoats and not too bad as figures go - apart from the smaller size which I have already whined about in previous posts.


Unit command with Colonel leading from the front and the drum sergeant - who took  a while to get right.


No standard bearers for the unit as apparently all the guard units left their colours back in Britan before heading over to America.


Detail of the fur backpacks came out OK and superb molding and sculpting made picking out the lace on the cocked hats quite enjoyable (if you're a partially autistic SOG).


Even spent some time going back over the figures to highlight buttonholes on the coats.


Really happy with the way these guys came out.

Sunday, 4 December 2016

AWI: The Problem With Light Infantry


So here's my first British light infantry unit for Black Powder: Rebellion! and the American War of Independence, which I painted last year while getting a commission done for some other Brits.

This unit has yellow facings and cuffs and really could be for any of the units with this regimental colouring - e.g. 6th, 9th, 10th, 12th, 15th, 16th, 20th, 26th, 28th, 29th, 30th, 34th, 37th, 38th, 44th, 46th 57th.


There are however, several minor but nevertheless enjoyable issues to overcome when producing British light infantry in this scale, for this period and rule set.

Firstly, for plastics, the only figures available are the A Call to Arms range's Set 65 British Infantry 1775 which contains British light infantry and grenadiers. Although these are highly detailed with accurate proportions and uniform, they're a little bit short.


Left to Right: Imex officer with helmet conversion, ACTA LI, IMEX Drummer, ACTA LI, Revell Jager (SYW Austrian)

Against the Accurate/IMEX figures they're short and against the other figures in this range and other periods close by, they are even shorter - almost by a head - closer to 18mm than 20mm/25mm.


As you can see, for instance, the IMEX drummer is a giant of a man compared to the light bobs. So what's to be done?

Cuban Heals is the answer or more precisely Cuban Bases. These guys and the shorter Accurate/IMEX figures are getting high heals in the form of 3mm thick bases from Litko, while the taller figure ranges get thin plastic or card for their bases.

This at least puts everyone's head near the right height which works well for units and for festooning the Brit LI battalions with command and musicians, then shaving off the molded plastic base on IMEX figures also evens the playing field.


The next issue, to overcome confusion during a game regarding which stand belongs to which unit, is how to dress the unit.


For this war it was common practice to combine companies of light infantry and grenadiers into their own battalions, stripping them from the line regiments to form their own units.

In a period where the only real discernible difference between regiments were the colours of facings and cuffs, this creates an issue.

Although BP: Rebellion! has many different (awesome) scenarios and hence unit size for these troops (they can be Small, Standard or Large), if sticking to history then each base in a unit should have a different colouring; and each unit of LI (and grenadiers for that matter), should have several colour facings/cuffs.


As light infantry regiments weren't formed until a few years after this conflict, in the early 19th century, you can either go with different colours and potentially get confused - i.e. which green stand goes with which unit, or paint the entire battalion in one facing/cuff colour.

As I wanted some LI unit's at battalion level and to act 'in line' with the cool shooty stats, I've opted for one facing/cuff colour for this unit which is technically incorrect but at least looks cool (unless of course the LI companies were taken from several line battalions, all with yellow facings - :o !).

It'll probably turn out that it really doesn't matter in terms of playability and each base will get its own colours to represent an individual company at battalion level. The rest will be formed as small skirmishing units in any case.


In fact I've probably overthought the problem but:

a) even with the molded base cut away, that drummer is huge! That's the last time I use one on the same base as the ACTA figures!

b) at least the hobby has, yet again, taken up a decent amount of my time and prevented me from hiring prostitutes and doing drugs :)


Saturday, 3 December 2016

AWI: Hesse-Cassel Brigade

... Mirbach sighed, moving forward past his adjutant, straining to see the dispositions of his brigade through the dust, as an infantry major rode up beside them expecting new orders.
There was still no sign of Lossburg's fusiliers, expected overnight, and he had had to fill the gap in the lines with a detachment of grenadiers. 
At least they had shown up, he thought. The large combined detachment from the south, including his own grenadier companies, had arrived just after dawn, just as they had been sending out the Jager companies to reconnoiter before the brigade.

It had been a hard decision to split the large detachment into two, but with both battalions of his regiment leading the brigade, supported by only one other battalion, he knew they would need further support. So he'd reserved a battalion strength group of grenadiers and sent the rest forward. 
'Still no sign of Lossburg'.' said his adjutant to the young major, who nodded in reply, steadying his horse and searched forward through the dust.
Mirbach could now see that the grenadier detachment was moving to the rear of his battalions as instructed - happy that he had split out the colours between his two battalions, so as to readily identify the units in the field - and had now taken their place alongside the Prinz Karl troops. 
These in turn were following the day's standing orders and crouching down behind their sister regiments as if to receive horseto avoid the errant bounce of canon balls .
While acknowledging the wisdom of the practice, Mirbach could not abide the slack and lackadaisical practices of the British and the rebels, who allowed their men to sit or lie on the ground as if at a picnic, when in reserve. 
Considering it hadn't rained for over a week in the area, he conceded that ordering men in the rear units to go 'low', was a practice of some merit and would otherwise reduce the casualties expected from canon fire that day.
 After allhe mused, one high ball had already sliced a tassel off of the first colour of his regiment and it was not yet nine'o'clock. But at least the soldiers of his brigade would rest at the ready and look respectable as they held their formation.

Suddenly, in the distance, a huge line of grey puffed smoke rose before his brigade, followed closely by a muffled and staggered roar; the rebels had started firing.
'Send a rider out,' he said finally, turning to his adjutant, 'we need Lossburg's troops here now...'

So something a bit different - after a comment at a recent Sudan Black Powder game regarding the lack of colour on the wargame table ;) - the first brigade of my AWI collection ready for Black Powder.

Two standard sized units of musketeers.

The line and grenadier figures are from Revell's Seven Year's War set 02572 Prussian Infantry.

Another standard unit of musketeers from the Revell Prussian set.

The slightly converted Jagers are from set 02574 Austrian Infantry.

A company of skirmishing Jagers - a small BP unit of 12 figures.

The command is a mix of the mounted officer from the Prussian set and I think, slightly converted 'officers' from set 02579 Austrian Artillery.

General von Mirbach aus Hesse-Cassel and ADC, with mounted battalion officer.

At this scale there is not a lot of discernible difference between the uniforms of the two periods - if any - and 'slight conversions' only involve slicing off errant plumes from hats - and other spurious bits of uniform and equipment as desired - with an Exacto knife, so these sets have been commandeered into line for AWI.

Combined battalion of grenadiers, small and standard sized BP units.

The awesome flags are once again from warflag.com, poles made from brass and bits off of the molded flags of the standard bearers from the Prussian set.

Close up of 2nd battalion, line regiment von Mirbach, the Warflag flags just add the right touch.

The paint job is a mix of a commission from Fernado Enterprises in Sri Lanka and my own efforts, from quite a few years back. The commision figures are a reasonable standard - called Collector - for the money paid.

Another company of Jagers, small skirmishing unit.

There is such a lot of variation within each nationality which, while it puts some folk off this period, a little careful reading can provide a great deal of nuance.

Far right, freed African slaves in paid service with the German mercenaries, many of the younger men and boys were employed as musicians.

All have been recently rebased for Black Powder and all in all I'm happy with the final result, and looking forward to a table covered in the bright colours from the uniforms of the period.

1st battalion, line regiment Prinz Karl,for a 24 year old set of figures, they have come out great.

Friday, 18 November 2016

Then There Was Four: Collecting 1/72


So a package arrived in the post the other day - oh yea!

Two boxes of OOP French Infantry for the American War of Independence, to complete a total of four boxes - more on this later.

I've been after these things for years and years, then earlier this year a mate of mine Tim, offloaded six boxes of 1/72 scale AWI figures. Six! One of which was the long OOP French.

I warned him and did my best to convince him that they were now collectors items and selling for as much as £25; trying to foist fistfuls of money upon him, but as a true gentleman he gave them away. Thanks Tim!

This triggered my OCD (Obsessive Collectors Disorder) and I wondered how I could find the other three boxes I needed.

Why three?

Because in 1/72, especially if you're playing Black Powder, you need to buy multiple boxes to make decent and regular looking regiments - also ironically in some cases, to make decent irregular looking regiments.

This is because there are some very varying pose qualities in a single box and you only get so many figures of one pose per box. So when collecting 1/72 figures and building BP units, you spend a lot of time trying to divide 24, 12, and 6 by the figure numbers listed at Plastic Soldier Review, then subtracting the number of command figures available; and producing the number of boxes you *NEED* to buy.


About half of my AWI 1/72 collection - I still need four more boxes of Americans!

So I went onto my friend - eBay - and started playing with the search functionality (to those familiar with eBay's search functions you can skip this bit).

So first I played with the search string as just typing 'italeri 6043 french infantry' returned hundreds of pages selling Italeri's Napoleonic French infantry sets.

To get rid of these sets from the results, I narrowed the search by removing those listings with the words 'line', 'napoleonic' and their box numbers; by adding a '-' before those terms.

Giving this search string:

italeri 6043 french infantry -6066, -6002, -line, -napoleonic

Accurate but it returned nothing because there were no current listings -  :( - and I cried hot tears of disappointment...

I didn't want to have to keep checking eBay for this listing, I'd been doing that for years and getting nowhere. So I created a regular and automated search using eBay's Follow Searches function, using the search string above.

eBay emails you when a new listing which meets the search criteria is put up.

Within three months of setting up the followed search, I was the proud owner of the three additional boxes of infantry I was after - remember these are rare OOP boxes - like hens teeth.

What joy and excitement prevailed in those early mornings, I can tell you, for me and even my two cats - who were rudely awakened from their respective positions on the bed by my hoots of merriment - to wake up to emails offering me the boxes of these long OOP figures - mostly because I'm a sad old git without a girlfriend :)

Anyhow just thought I'd share a decent, automated way of finding OOP bits and bobs on eBay.

Now alls I need to do is paint up the regiments!!